
Today I spent the whole day reading the Strobist blog having quite a lot of fun and important insights into how I am going to use my nice 580EX-II correctly. As a result I spent quite a lot of money (about 150 Euros) at some US Shop by ordering some remote triggers for the flash, umbrella stands, umbrellas, color gels, etc. pp. I hope they will arrive soon!
In the meanwhile I had a look at two quite intriguing images. The first one contains some kind of zombie with a lot of cracked skin. I was wondering how the photographer created this nice effect. The second image is just beautiful. I like this sometimes cheesy angel-type of photoshopped women. This one is not cheesy at all, is it? I looked for stock photos of nice wings for quite a while on the web but did not find anything useful. (I guess I still have to improve on this type of search - I just stumbled over TinEye which seems to be a good way to go in future...)
Today I also wanted to try out to use two flashes, triggered by the Canon infrared method. A colleague lent me his Sigma 430EX-something flash which turned out to be perfectly compatible with the Canon 580EX-II.
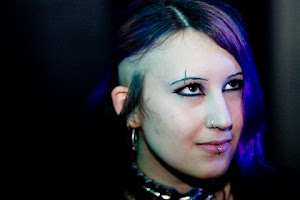
Thus, the idea was clear: I wanted to create an angel with some severe skin problems and some interesting lighting achieved by the two flashes. On the left you can see the result. I still think I can do better - especially the wings are hand-drawn with different sizes of half-transparent black brushes. If I only had a tablet, I could make this much nicer. Perhaps I will buy one as soon as I have more money.
Ups, sorry. First things first. How did I take the photo? Firstly, I created some space in the living room. I put some diffusor on the camera-mounted 580EX and laid the 430-whatever-Sigma-thing onto the couch, directed upwards with a focal length of 17mm. I did some test shots to make sure there is enough light everywhere, then I invited my model (which will remain anonymous for now ;P - and which unfortunately was a guy) and asked him to pose as you can see in the image. The harsh light from the bottom left gives some dark atmosphere to the image even though it was shot on a white background (I still don't know how to conveniently(!) create a large and smooth enough black background).
The setup was kind of simple, I think. Well, I switched the camera to fully manual and did not use E-TTL-II and such, so I had to adjust all the stuff a little. I figured that the best way to see if things went right is to take the histogram into account - the more intensities I used, the smoother the postprocessing becomes.
Okay, the postprocessing wasn't that hard either. After extracting the subject, I drew the wings. (I still need some practice in extracting the subject from the background...) Then, I google-imaged some very large files containing "dry soil", found some nice images and removed the most interesting parts. The next step was surprisingly simple: I turned the texture to gray and used the Transform tool to roughly rotate and scale the soil to align to the right arm of the model. In the next step I used the Warping function of the Transform tool (right click) and tried to simulate the vaulting of the arm. After I was done, I used the Eraser tool to create some smooth transition between real skin and defect skin. Set the layer mode to multiply. Done. The same I did with the crack in the breast of the guy.
Of course I could not withstand the temptation to add some glow to the angel's eyes in order to make it look more dangerous and surreal.
I think, my next steps will be to more firstly use umbrellas and stands and remote controls for the flashes to more easily adjust the lighting situation. Then I need to focus on object extration by utilizing all the nice tools - people also say that a tablet might help a lot here, too. After this is done, I urgently need to find out how to get more "requisites" from stock photos.
Man, that's a lot of fun!


Keine Kommentare:
Kommentar veröffentlichen